The proper measuring and inspecting of your sheet metal before and after forming are key steps in precision bending. Knowing the properties of the metal allow accurate setups and processes. Once the bends have been completed inspection of the finished product ensures quality control as well as good feedback for adjusting calculations and bending.
Inspecting the Sheet Metal before Forming
The first link in the material chain of your operation is going to be your material supplier. Utilizing a single, reliable, supplier is recommended because any variations in material thickness, purity, coating, protective film, and treatment methods will affect your bending. Some of these variables will obviously have a greater impact on your operation but it is important to be aware of all of them. When material is first received from your supplier it should always be gaged with a micrometer to ensure that the sheets are the proper thickness. Gaging should always be done in the same location of the sheet because during the process of rolling metal into sheets the rollers are not always able to apply even pressure on the sheet, leading to a slightly thicker center of the roll. If you were to measure the long edge of your sheets you may see a slightly different thickness than the center of the short
edge.
Micrometer

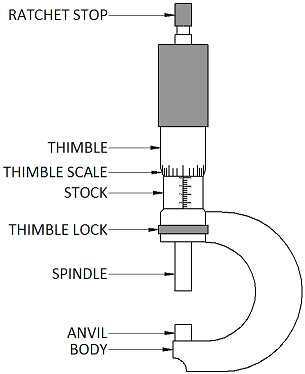
The micrometer is a common stumbling block for new material inspectors so let’s take a look at its basic structure and implementation. The micrometer acts on the basic principle that a threaded screw is attached to a thimble and spindle. As the thimble is turned the spindle is driven down against an anvil. The sheet metal being inspected is placed between the spindle and anvil. Each turn of the screw is precisely translated to the vertical movement of the spindle. Once the spindle, sheet metal and anvil are all in contact a small ratchet stop is used to turn the thimble until a standard torque is reached. The precise thickness of the sheet metal is now represented by the height and rotation of the thimble.
Using the vertical scale in combination with the rotation of the thimble scale a precise metal thickness is derived. For a better tutorial on how to read a micrometer see this tutorial.
The use of a micrometer is preferable when inspecting sheet thickness because of the added decimal place. Material thickness will affect your bend operation more significantly than any other factor so it’s important to be as precise as possible when inspecting.
Caliper
If a micrometer is not available, or your level of precision does not require a 4th decimal place then a caliper can be used to simplify the process of inspecting your incoming sheet metal. The caliper works on the basic principle of using either a veneer gauge or a rack and pinion gear driven dial to measure the distance between two jaws. The sheet metal is placed between the jaws and they are closed down with a consistent pressure. The resulting sheet thickness is represented either on the veneer or dial gauges. While they are typically slightly less precise than a micrometer calipers are often chosen because of their ease of use. Many types of digital calipers further simplify the inspection process.
Inspection of Formed Sheet Metal
Micrometers and calipers can still be used to inspect a formed piece of sheet metal, however there are a few tools used specifically for the inspection of sheet metal parts. These tools should be available in any press brake department and sheet metal operators should be trained in their uses. Design engineers should use them on a regular basis to ensure continuing accuracy of parts. Correct inspection and design of parts is key to minimizing re-work later on in the shop.
Protractor
Sheet metal protractors come in two basic styles, one is a basic protractor which is typically accurate to 1° and the other is the veneer type, which is usually accurate to .1°. Sheet metal fabrication is rarely required to be accurate to more than plus or minus 1° because most medium and light gauges can be moved the last degree or so by hand, meaning they won’t interfere with the finished product. However high tolerance bending of heavier gauges may require a higher level of accuracy.
Radius Gauge
Radius gauges are often used to inspect the bends of formed sheet metal.