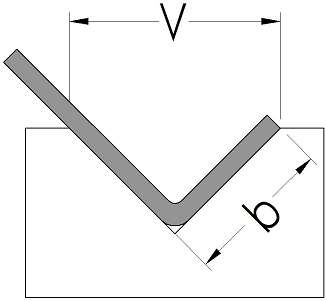
An Air Bend Force Chart, or Force Chart breaks down a number of key components of sheet metal bending in an easy to reference format. Being able to read a bend force chart is crucial for any Brake Press operator and sheet metal engineer. The gauge, inside radius, die opening, and minimum flange length are all interconnected through different equations and relationships, the Air Bend Force Chart organizes these variables and points the way towards the ideal setup.
The first column of the chart, Gauge, is the thickness of the sheet metal being bent. The three top rows indicate the V Opening (V), Minimum Flange Length (b) and the Inside Radius (IR). The values listed on the chart are the tonnages required per foot / meter of sheet metal. Being able to read this chart will allow you to predict any of these values given the others. It should be noted that in a number of the equations below a variable ‘k’ is used. This variable is simply meant to represent a constant because many of the equations below are meant to show relationships, not actual values. Always refer to your chart for actual tonnages. Typically a manufacturer will provide a chart along with a press brake or tooling. Below is a chart based on the averages of a few different charts found on the web.
Air Bend Force Chart
V (Inches) .118 .157 .236 .276 .315 .394 .472 .551 .630 .709 .787 .866 .984 1.260 1.575 1.969 2.48 3.150 3.937 4.921 6.299 7.874 9.843
Minimum Flange Length .085 .110 .165 .193 .221 .276 .340 .397 .454 .510 .567 .624 .708 .945 1.181 1.393 1.754 2.228 2.784 3.48 4.455 5.568 6.961
Inside Radius .020 .026 .039 .046 .053 .066 .079 .092 .105 .118 .131 .144 .164 .210 .263 .328 .413 .525 .656 0.82 1.05 1.312 1.641
Gauge Decimal.
20 .0359 7.0 5.4 3.6 3.0 2.5 2.0 1.7
18 .0478 7.2 5.8 4.8 3.7 2.7 2.4 2.0
16 .0598 7.8 6.0 5.0 4.2 3.5 3.1 2.7
14 .0747 11.3 7.5 7.1 5.6 4.8 4.1 3.0 3.2
12 .1046 15.8 13.0 10.5 9.5 7.5 6.3 5.6 4.0
11 .1196 16.1 13.1 10.1 8.4 7.2 5.0 3.8
10 .1345 12.0 10.8 8.1 6.2 4.7 3.5
3/16 .1875 24.1 15.0 11.3 7.5 5.8
1/4 .2500 30.0 20.0 15.0 10.5 8.5
5/16 .3125 37.6 25.00 18.8 13.1 10.0
3/8 .3750 38.3 28.1 22.5 15.0 11.3
1/2 .5000 52 39.0 30.0 22.0 16.0
5/8 .6250 70.0 52.5 37.5 27.5 20.0 15.0
3/4 .7500 66.0 45.0 32.3 22.5
1 1.0000 90.0 60.0 44.0
1-1/4 1.2500 102.5 75.0
Calculating Required Tonnage For Bending
Once you understand how to use a bend force chart it is easy to calculate the necessary tonnage for any bend operation:
- Calculate your desired V Opening based on the thickness of the sheet metal you’re bending. Round up to the nearest V Opening on the chart to match to your tooling.
- Calculate the ratio of the tensile strength of your material to the standard steel. (.3% Carbon, 45 kg/mm²). We do this because most Air Bend Force Charts are based off of standard steel.
- Multiply the Work Piece Length (L) by the Tonnage Per Foot (F) from the standard force chart by the ratio of the material’s Tensile Strength (TS) to the tensile strength of mild steel.
Minimum Flange Length (b)
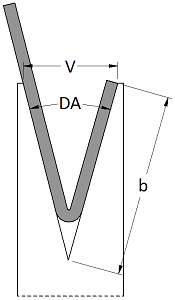
The minimum flange length is sometimes the most difficult limitation for new brake operators and engineers to understand. Until the bend is completed the sheet metal must be supported on both sides of the v opening. If it’s not supported on both sides the sheet slides into the v opening and the bend line will slide with it. This can first cause irregular and inaccurate bends and even risk damaging the die. When the material begins to bunch up inside the die under pressure it can cause the die to break and in some circumstances even burst. Understanding and respecting the minimum flange length is important for accuracy and safety. The minimum flange is not simply the half the v opening as one might initially suspect, instead it’s related to the geometry of v opening as a triangle. Because the bend must be supported all the way until the bend is complete the flange must be long enough to reach the top of the die after it’s been fully formed. Brake press operators should know the minimum flange lengths for their tooling before attempting bends that may not work and while it is possible to calculate the minimum flange having an Air Bend Force Chart on hand certainly makes it more convenient.

This formula however only applies to 90° dies. When determining your minimum flange for acute angle dies you will use a more complicated trigonometric formula. This formula uses the V Opening (V) and the Die Angle (DA) as well as the trigonometric functions, tan and sin to find the Minimum Flange (b).

V Opening (v)
The relationship between the v opening and the required tonnage is straight forward, the larger the v opening the less tonnage is required to bend the metal. The relationship is inversely proportional so if the v opening is doubled the tonnage will be halved. This idea should make sense as the larger the v opening the more leverage the punch has over the sheet metal. It should be noted that as the v opening is increased both the bend radius and the minimum flange length increase. Both of these are important design elements which are not to be over looked. It is common for an engineer to have to specify which v opening is used in order to ensure that a bend can be completed, or that a desired radius is achieved. As you can see below the relationship between the inside radius and the v opening occurs because the sheet metal has more room to bend. I don’t know of a formula for the relationship between the v opening and the inside radius, but then again this is why bend force charts are created, to help you fill in the blanks.

Material Thickness (Mt.)
The thickness of the material is not proportional to the tonnage like the v opening. Doubling the thickness does not mean doubling the tonnage. Instead the bending force is related by the square of the thickness. What this means is that if the material thickness is doubled the tonnage required increases 4 fold.
Work Piece Length (L)
Like the v opening the tonnage required is directly related to the length of the work piece. Doubling the work length means doubling the required tonnage. It should be noted that when bending short pieces, under 3” in length, the tonnage required may be less than that which is proportional to its length. Knowing this can prevent damaging a die.
Inside Radius (ir)
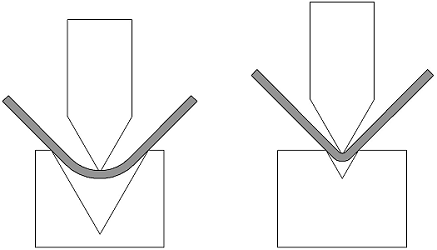
The inside radius is directly related to the v opening, the larger the v opening the larger the radius. It is a common misconception that the bend radius is always going to equal the punch tip radius. This only occurs when Bottom Bending or Coining, processes where the punch tip is pressed into the workpiece.
Tensile Strength (TS)
The tensile strength is a property of the metal and is based off of how much force is required to cause the material to fail or break. The required tonnage is directly related to the tensile strength of the material. As we’ll show below the tensile strength serves as a convenient way of converting a bend force chart from one material to another.
Below are the tensile strengths of different materials.
Material Soft (kg/mm^2) Hard (kg/mm^2)
Lead 2.5 - 4 -
Tin 4 - 5 -
Aluminum 9.3 171
Aluminum Alloy Type 4 23 48
Duralumin 26 48
Zinc 15 25
Copper 22-28 30-40
Brass (70:30) 33 53
Brass (60:40) 38 49
Phosphor Bronze / Bronze 40-50 50-75
Nickel Silver 35-45 55-70
Cold Rolled Iron 32-38 -
Steel .1% Carbon 32 40
Steel .2% Carbon 40 50
Steel .3% Carbon 45 60
Steel .4% Carbon 56 72
Steel .6% Carbon 72 90
Steel .8% Carbon 90 110
Steel 1.0% Carbon 100 130
Silicon Steel 55 65
Stainless Steel 65-70 -
Nickel 44-50 57-63